saktumiva2-editor
Getting started with the Saktumiva editor
A tutorial for new users: from your first manuscript transcription to an edition published on the web.
Saktumiva is Charles Li’s software for collating multi-witness texts and making a critical apparatus. The Saktumiva editor is a screen that runs on your own computer and puts Saktumiva’s collation to work while you edit: you see each passage of your edition, the apparatus Saktumiva makes for it, and every witness’s text side by side, and your decisions are written straight back into your TEI files.
This tutorial assumes no knowledge of git or GitHub, and only a little of XML. It has eight parts:
- Transcribing manuscripts in TEI XML
- A GitHub repository for your edition
- Creating a provisional edition file
- The working file and the published file
- Finding and installing the editor
- Checking for updates
- Opening your files in the editor
- The work cycle: edit, save, publish, push
Short videos for each part are planned; their scripts are in video-scripts.md.
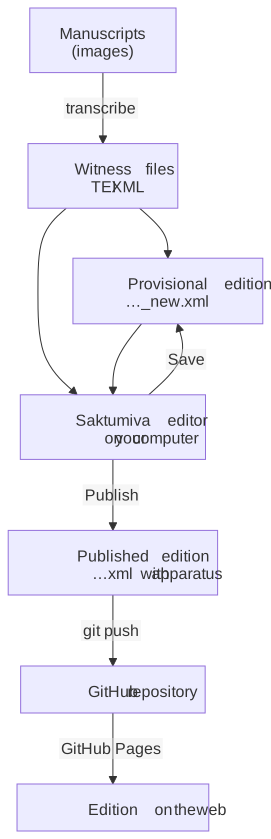
The whole journey at a glance:
1. Transcribing manuscripts in TEI XML
Every witness (a manuscript, or a printed edition) is transcribed into its own file in TEI XML. TEI is a large vocabulary, but Saktumiva needs very little of it. The rules are given on the Saktumiva website, on the page TEI tagging, with the transcription conventions on a page of their own.
The two things Saktumiva must have
- A siglum, in the header:
<idno type="siglum">K</idno>. This is the name the witness has in the apparatus. - An
xml:idon every passage: each verse (<lg>) or paragraph (<p>) carries a unique id, and the same passage carries the same id in every witness and in the edition. That is how Saktumiva knows which pieces of text to collate with which. Ids must begin with a letter, e.g.SS.3.1.1orch1.12.
Verse lines go in <l> inside <lg>. Choose an id scheme at the start and keep to it: book, chapter and verse
(SS.3.1.1 = Suśrutasaṃhitā, book 3, chapter 1, passage 1) works well.
A minimal witness file
<?xml version="1.0" encoding="UTF-8"?>
<TEI xmlns="http://www.tei-c.org/ns/1.0">
  <teiHeader>
    <fileDesc>
      <titleStmt>
        <title>MS Kathmandu KL 699: Śārīrasthāna</title>
      </titleStmt>
      <publicationStmt>
        <p>Your project's name</p>
      </publicationStmt>
      <sourceDesc>
        <msDesc>
          <msIdentifier>
            <settlement>Kathmandu</settlement>
            <institution>Kaiser Library</institution>
            <idno>699</idno>
            <idno type="siglum">K</idno>
          </msIdentifier>
        </msDesc>
      </sourceDesc>
    </fileDesc>
  </teiHeader>
  <text>
    <body>
      <pb n="68v"/>
      <lg xml:id="SS.3.1.1">
        <l>athātaḥ sarvabhūtacintāṃ śārīraṃ vyākhyāsyāmaḥ ||</l>
      </lg>
      <p xml:id="SS.3.1.3">sarvabhūtānāṃ kāraṇam akāraṇaṃ ...</p>
    </body>
  </text>
</TEI>
The quickest way to get a complete header is Charles Li’s TST editor: choose new file, fill in at least the fields marked in red, and put the siglum in the Text id field. If the manuscript’s images are online with a IIIF manifest, put the manifest’s address in the IIIF manifest field: the Saktumiva editor will then show you the page image beside each passage.
The small set of transcription tags
Transcribe diplomatically: what the scribe wrote, including corrections and damage, in IAST (with the ISO 15919 exceptions given in the conventions). The Saktumiva website lists the tags for that; the ones you will use most are:
| Tag | For | Example |
|---|---|---|
<pb n="…"/> |
a new page or folio | anekaviṣayanihi<pb n="3r"/>tapadānām |
<lb n="…"/> |
a new line | vya-<lb n="5"/>vahāre |
<caesura/> |
the caesura of a verse line | ya<caesura/>thā |
<subst>, <del>, <add> |
the scribe’s own corrections | sarva<subst><del rend="crossed out">vidyā</del><add place="right-margin">śabdā</add></subst>nām |
<choice>, <orig>, <corr> |
your correction of the scribe | va<choice><orig>ṃta</orig><corr>rta</corr></choice>tamānaḥ |
<sic> |
as written, uncorrected | viśeṣo<sic>pa</sic>dhiḥ |
<gap/> |
text you cannot read | sā<gap reason="damaged" unit="akṣara" quantity="5"/>rvārthyam |
<unclear> |
text you can read only doubtfully | svarūpānyathā<unclear>t tānāpapaptiḥ</unclear> |
<supplied> |
text you have supplied | ta<supplied>d</supplied> dravyam |
<space/> |
a blank in the manuscript | <space unit="akṣara" quantity="2"/> |
<note> |
a note in the manuscript (or by you) | <note place="inline">(pa॰ 1\|1\|16)</note> |
The others (<hi>, <metamark>, <milestone>, <pc>, <retrace>, <surplus>) are on the
TEI tagging page.
Tip. You do not need to transcribe everything before you start. Transcribe the first few verses from two or three witnesses, go through parts 2 to 7 of this tutorial, and see your first apparatus. Then carry on.
Script notes
If a scribe does not distinguish two letters (śa and sa, ba and va …), say so in the header and the editor will not report those differences as variants for that witness:
<physDesc>
  <scriptDesc>
    <scriptNote xml:id="script-śa-sa">śa and sa not distinguished.</scriptNote>
  </scriptDesc>
</physDesc>
2. A GitHub repository for your edition
Why GitHub?
Your edition will be published from GitHub: GitHub keeps your files, and its free GitHub Pages service turns the repository into a website where anyone can read the edition with its apparatus. Along the way you also get a complete history of every change, a backup, and an easy way to work with collaborators.
There are two copies of your work, and git keeps them in step:

- A commit is a saved version in your local history. The Saktumiva editor makes one for you every time you save or publish, so you rarely need to do this yourself.
- Push sends your new commits to GitHub. Nothing goes online until you push.
- Pull fetches commits from GitHub, for example a collaborator’s work, or changes you made on another computer.
Creating the repository
- Make a free account at github.com if you do not have one.
- Click + → New repository. Give it a short name without spaces (e.g.
Rasendramangala), choose Public (GitHub Pages is free for public repositories), tick Add a README file, and click Create repository. - Get a copy on your computer (“clone” it). Two ways:
- GitHub Desktop (recommended if you are new to git): install it from desktop.github.com, sign in, choose File → Clone repository, pick your new repository and a folder on your disk, and click Clone.
-
The command line: on the repository’s page, click the green Code button, copy the address, and run
git clone https://github.com/YOUR-NAME/YOUR-REPOSITORY.git
You now have a folder on your disk that is linked to the repository on GitHub. Everything for your edition goes in it.
How to lay out the folder
The editor works with sections: one folder for each chapter (or other unit), holding that chapter’s edition file and its witness files. A repository with several chapters looks like this:
Rasendramangala/                     ← the project (your repository)
├── README.md
├── chapter1/                        ← a section
│   ├── provisional_edition_ch1_new.xml
│   ├── a1_ahmedabad_ldi_9442_ch1.xml
│   ├── g_gondal_34_ch1.xml
│   ├── l_london_ch1.xml
│   └── alignments/                  ← made by the editor
├── chapter2/
│   └── …
A text with only one part can have a single section: the files go straight into the repository’s top folder.
Keeping the two copies in step
Make these two habits:
- Before you start work: pull. In GitHub Desktop, click Fetch origin, then Pull origin if it appears.
On the command line:
git pull. - When you finish: push. In GitHub Desktop, click Push origin. On the command line:
git push.
If you add files yourself (a new witness transcription, say), commit them first. In GitHub Desktop, tick the files, write a short summary at the bottom left (“Add transcription of MS L, chapter 1”), and click Commit to main. On the command line:
git add chapter1/l_london_ch1.xml
git commit -m "Add transcription of MS L, chapter 1"
git push
A word about Dropbox, OneDrive and iCloud. If your repository is in a synced folder and you work on it from two computers, the sync service and git can get in each other’s way. GitHub already gives you the backup and the copy on your other computer: clone the repository there too, and pull before you start.
Turning on the website
Once you have published something (part 8), switch on GitHub Pages: on the repository’s page go to
Settings → Pages, under Build and deployment choose Deploy from a branch, branch main, folder
/ (root), and click Save. After a minute or two your files are on the web at
https://YOUR-NAME.github.io/YOUR-REPOSITORY/, and a published edition file opens at, for example,
https://YOUR-NAME.github.io/YOUR-REPOSITORY/chapter1/provisional_edition_ch1.xml.
For the published file to display as a readable edition rather than raw XML, the section needs Saktumiva’s page
style, edition.xsl, and the TST script library that goes with it. Charles Li’s
setup instructions say where to get them: edition.xsl goes in the
section folder (the editor then links it automatically when it publishes), and the TST libraries in a folder
lib/. The simplest way is to copy the arrangement of an existing project such as the
Suśrutasaṃhitā.
3. Creating a provisional edition file
The edition file is the text you establish. It has the same structure as a witness file, with the same
xml:ids, but the text in it is your edited text. At the start it is only provisional: a first version that you
will improve passage by passage in the editor.
The easiest way to make one:
- Copy your best witness, or a printed edition if there is one (the “vulgate”). Its text will be your starting point.
- Name the copy so that the editor recognises it: the name should contain
edition, and a working copy should end in_new, e.g.provisional-edition_sarirasthana_new.xmlorprovisional_edition_ch1_new.xml. - Change the header: the
<title>(e.g. “Rasendramaṅgala, chapter 1: provisional edition”), and give the edition its own siglum, e.g.<idno type="siglum">Ed</idno>. Take out the manuscript description that you copied. - Clean the text: remove the witness’s page and line breaks (
<pb/>,<lb/>), its corrections and its other diplomatic markup, so that what remains is plain edited text in<lg>/<l>and<p>elements. - Check the ids: every passage that should be collated must have the same
xml:idas in the witnesses. A passage you have not edited yet can stay as an empty<lg xml:id="SS.3.1.2"><l/></lg>; the editor still lists it, and you can fill it in later. - Commit the new file (see part 2).
A passage of an edition file looks like this:
<lg xml:id="SS.3.1.1">
  <l>athātaḥ sarvabhūtacintāṃ śārīraṃ vyākhyāsyāmaḥ ||</l>
</lg>
You do not write any apparatus yourself. Saktumiva makes it from the witnesses, and the editor keeps it up to date as you edit.
4. The working file and the published file
Each section has two edition files with almost the same name. It matters which is which:

…_new.xml, the working file. This is the master copy of your edition: the text and your notes, and nothing else. Every Save in the editor writes to it. You may also open it in another XML editor (Oxygen, VS Code …).….xml(without_new), the published file. Publish writes it from the working file: your text exactly as it stands, plus the list of witnesses, the link to the page style, and a complete apparatus for every passage, made by Saktumiva’s own code. This is the file readers see on the website.
The published file is output. Do not edit it by hand: the next Publish replaces it, and your changes would be lost. Correct the working file (or a witness), then publish again.
When you open a section for the first time, the editor proposes which file is which. It takes a file whose name
contains “edition” and ends in _new (or _working, _draft) as the working file, and a file that already contains
a Saktumiva apparatus as published output. If there is no published file yet, Publish writes
<working file name>_with-apparatus.xml. To publish to the name without _new instead, type that name into the
Publish to field of the setup screen (part 7). It is stored in the section’s editor.config.json:
"publishTo": "provisional-edition_sarirasthana.xml"
5. Finding and installing the editor
The editor lives on GitHub at github.com/sushrutaproject/saktumiva2-editor. There are two ways to install it.
The ready-made program (easiest)
- Go to the latest release.
- Under Assets, download the file for your computer (its name contains
linux,macosorwindows). - Unzip it, and put the program somewhere you will find it again.
- Run
saktumiva-editor(on Windows,saktumiva-editor.exe).
A terminal window opens, and the editor opens in your web browser. Leave the terminal window open while you work; closing it (or pressing Ctrl+C in it) stops the editor. If you start the editor again while it is still running (perhaps in a terminal window you forgot about), it does not start a second copy: it opens the running one in your browser.
The first time only:
- macOS: the program is not signed by Apple, so macOS refuses to open it with a double-click. Right-click it and choose Open, then Open again. (The ready-made program is for Apple silicon Macs, M1 and later; on an older Intel Mac, install it with Python, below.)
- Windows: SmartScreen may warn about an unknown publisher. Click More info → Run anyway.
With Python (Intel Macs, or Python users)
If you have Python 3.10 or later, install the editor in its own virtual environment:
python3 -m venv ~/saktumiva-editor-env
~/saktumiva-editor-env/bin/pip install git+https://github.com/sushrutaproject/saktumiva2-editor.git
Then type ~/saktumiva-editor-env/bin/saktumiva-editor in a terminal.
You also need git installed for the editor to keep the history of your saves (GitHub Desktop users on Windows and macOS: install git as well, from git-scm.com). Without git the editor still works, but it tells you that saves are not versioned.
6. Checking for updates
In the editor, open Help ▾ → Check for updates…. The editor asks GitHub whether there is a newer release. If there is, it tells you what has changed and how to update, in the way that fits how you installed it:
- Ready-made program: a link to the new download. Download it, unzip it, and replace the old program with it.
- Installed with Python: a command to copy into a terminal, of the form
…/bin/python -m pip install --upgrade ….
Then stop the old copy (close its terminal window, or press Ctrl+C in it) and start the new one. If you forget, the new version tells you that an older copy is still running, and where.
You can also check from a terminal:
saktumiva-editor --check-updates
and see which version you have with saktumiva-editor --version, or under Help ▾ → About.
Updating the editor never touches your files: your transcriptions and edition live in your repository, not in the program.
7. Opening your files in the editor
Start the editor. The first screen is the project chooser:
- Recently opened lists the last six sections you worked on, most recent first. Click one to go straight to it, or click Project… beside it to see that project’s other sections.
- Otherwise, under Open a folder, type the path of your repository’s folder, or press Browse…, find the folder and press Use this folder.
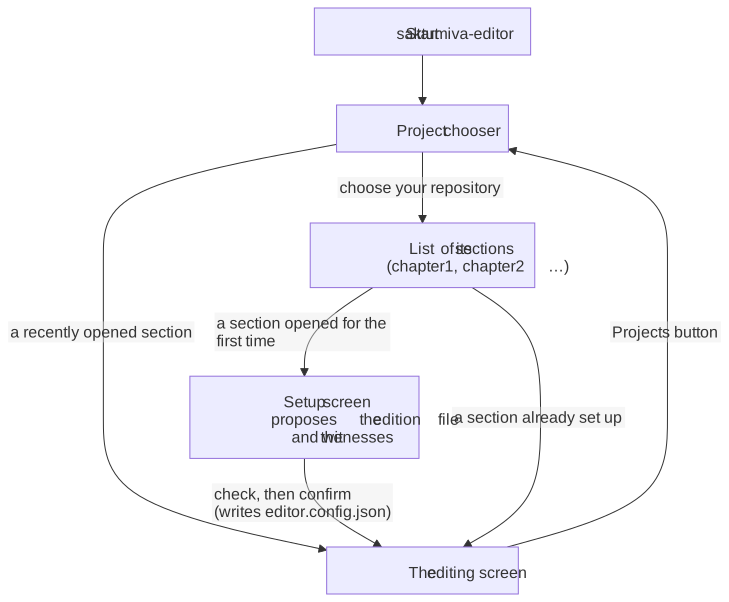
The chooser lists the sections it finds in the project. The first time you open a section, the setup screen shows what the editor proposes:
- Edition: the working file, the text you edit (
…_new.xml); - Witnesses: the transcriptions collated with it;
- Publish to: the file Publish writes (part 4).
Check it carefully, change it if necessary, and press Create editor.config.json and open. The editor saves your
choice as editor.config.json in the section folder; commit and push that file along with the rest. To change it
later, use Change which files are the edition and the witnesses in the chooser.
You can also start the editor on a folder directly from a terminal:
saktumiva-editor ~/git/Rasendramangala                         # choose one of its sections
saktumiva-editor ~/git/Sushrutasamhita_Saktumiva2/03-su.sa     # open this section straight away
The editing screen
Its parts:
┌────────────────────────────────────────────────────────────────────────────────────────┐
│ ☰ Saktumiva editor  chapter1   Undo Redo [Save] Publish History Settings Projects Help▾ ☰ │
├──────────────┬──────────────────────────────────────────┬──────────────────────────────┤
│ Find…        │ ◀ SS.3.1.3 ▶  Edit text  TEI source  Add note │ Witnesses               │
│ SS.3.1.1     │                              A−  A  A+   │ ⠿ K  athātaḥ … [image] [edit] │
│ SS.3.1.2     │  the passage, as in your edition file    │ ⠿ N  athātaḥ … [image] [edit] │
│ SS.3.1.3  •  │  (underlined words have variants)        │  …                           │
│ …            ├──────────────────────────────────────────┤                              │
│              │ Apparatus              Correct alignment │  page image                  │
│              │  sarvva° ] sarva° K N           [use]    │  (when you open one)         │
│              ├──────────────────────────────────────────┤                              │
│              │ Notes                                    │                              │
└──────────────┴──────────────────────────────────────────┴──────────────────────────────┘
- Passage list (left): every passage with an
xml:id. Type in the box at the top to find a passage or words. A dot marks a passage with unsaved changes. - Text (centre): the passage as it stands in your working file. Underlined words have variants; click one to find its apparatus entry.
- Apparatus: made by Saktumiva for this passage. The first time you open a passage, the editor collates it (this may take a moment for long prose passages; afterwards the result is kept).
- Witnesses (right): each witness’s text of the passage, with buttons for its page image and for correcting its transcription. Drag a witness by its handle (⠿) to put the list in the order you like; witnesses that lack the passage are always listed last.
Make the screen fit your way of working: the ☰ button at the far left (or the [ key) hides and shows the passage list, and the ☰ at the far right (or the ] key) the witnesses. A− A A+ above the text (or Ctrl+−, Ctrl+0, Ctrl++) change the size of the text. The editor remembers these choices, and the order of the witnesses, the next time you start it.
If your edition’s header contains a stemma (a <stemma format="nexml">, as SplitsTree6 and Saktumiva write it), a
Stemma button appears in the top bar and draws it, with the sigla at the leaves. Download SVG saves the
drawing. Making a stemma is beyond this tutorial: see Charles Li’s guide, listed at the end.
Help ▾ → Using the editor describes every part of the screen.
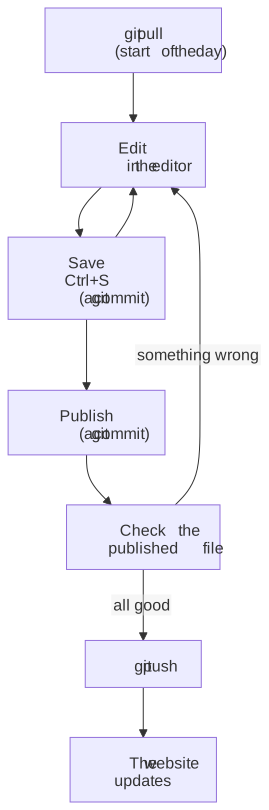
8. The work cycle: edit, save, publish, push
Edit
In the editor you can:
- Choose a reading from the apparatus: point at a reading and press use. It goes into your text, the passage is collated again, and the old reading becomes a variant.
- Type in the text: Edit text (or key E). Grey boxes are markup (caesura, anchors, page breaks); they are protected, but you can delete them. Tick Record as emendation to add an emendation note at the same time. TEI source lets you edit the passage as XML for anything else.
- Add a note: select a word and press Add note here. The editor creates the anchor in the text and the note together, with matching ids.
- Correct a witness’s transcription: edit beside the witness. This is saved at once to the witness file.
- Correct the alignment, when Saktumiva has lined the witnesses up wrongly: Correct alignment (or key A).
Undo (Ctrl+Z) works until you save.
Save
Save (Ctrl+S) writes the passages and notes you changed into the working file (…_new.xml), and nothing else:
the rest of the file keeps its own formatting. Each save is a git commit that lists what you changed, so you can
always go back (History shows the saved versions).
Before saving, the editor checks that the file has not been changed by another program in the meantime, that the
result is well-formed XML, and that the xml:ids are still unique. If you also use Oxygen or another XML editor,
save there and reload the editor before going on, or the editor will refuse to overwrite your other changes.
Save often. Saving does not publish anything.
Publish
When you have done a piece of work, press Publish. The editor writes the published file: your working file plus a fresh apparatus for every passage (see part 4). Passages that need collating are collated first; this can take some minutes the first time for a long section, and is quick afterwards. At the end the editor lists any passages that have no apparatus (for example, passages that no witness contains). The published file and the updated alignment files are committed together.
Check
Look at the published file before you push it: open it in your XML editor, or look at the diff in GitHub Desktop (the Changes and History tabs show exactly what changed). If something is wrong, go back to the editor, fix it in the working file, save, and publish again.
Push
When you are happy, push (GitHub Desktop: Push origin; command line: git push). Your commits, the working
file, the published file and the alignment files go to GitHub, and a minute or two later the website shows the new
version of your edition.
A typical day
- Pull.
- Start the editor and open your section.
- Work through some passages, saving as you go.
- Publish, and check the result.
- Push.
- Close the editor’s terminal window.
Where to find more
- The editor’s README: every setting, the project file
saktumiva-project.json, and what the editor cannot yet do. - Charles Li, Reconstructing a Pali, Sanskrit, Tamil, or Tibetan text using computers: the full Saktumiva method, including trees and stemmatic reconstruction.
- Saktumiva.org: transcription conventions and TEI tagging.
- Projects that use the editor: the Suśrutasaṃhitā and the Rasendramaṅgala.